One good hair tool used to mean one good hairstyle. A curling iron gave you curls. A flat iron gave you straight. A blowdryer gave you dry. If you wanted all three, you needed all three — plus the drawer space, the time, and the morning stress of switching between them.
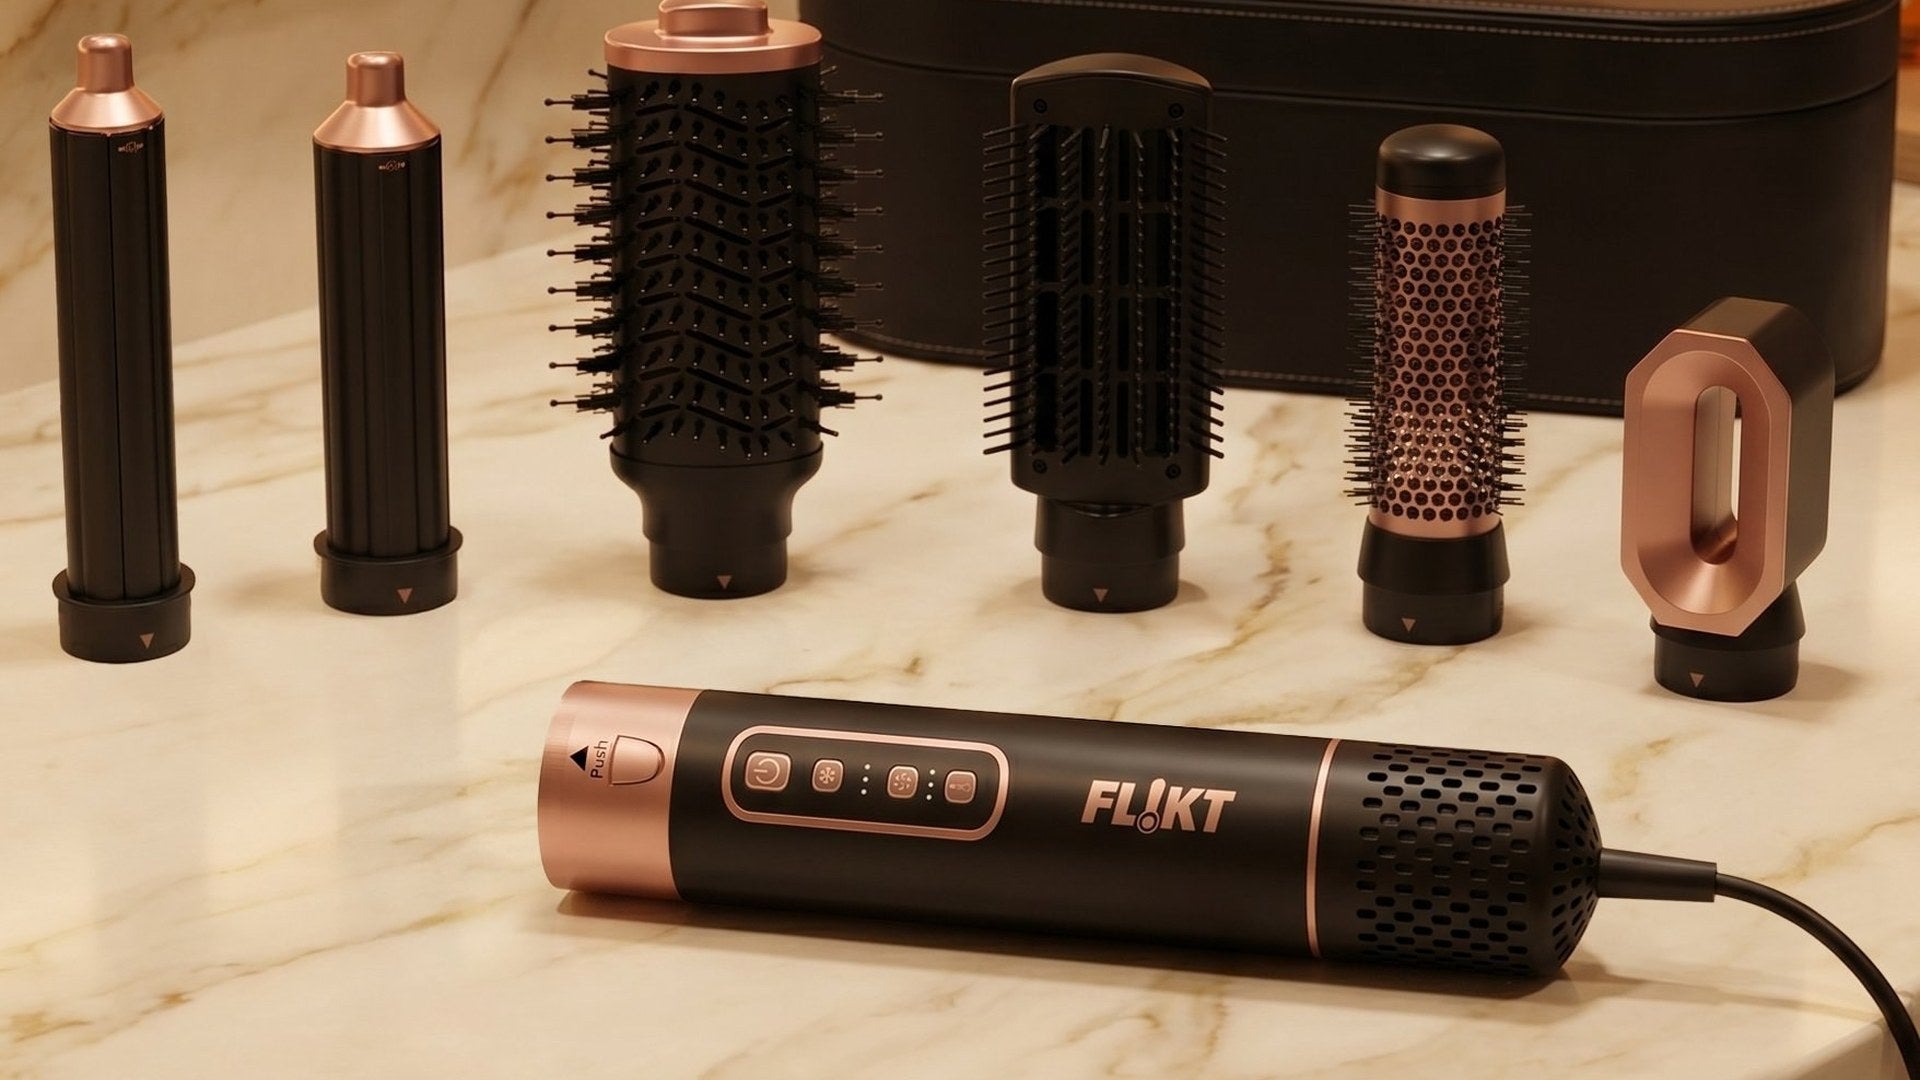
The FL!KT 6-in-1 Hair Styling Wand changes that equation entirely. One tool, six interchangeable attachments, and a 110,000 RPM brushless motor generating 3 million negative ions — so it dries, smooths, volumises, curls and defines without the heat damage that comes from layering multiple tools at high temperatures..
This guide covers everything: what each attachment does, how to use them, which hair types get the best results from each one, and how to build a routine that actually works for you.
Table of contents
What is a 6-in-1 hair multi-styler?
A 6-in-1 multi-styler is a single styling unit with interchangeable attachments that let you create multiple different hairstyles from one device. The core unit houses the motor and airflow technology — and you simply click on the attachment for the look you want.
Most multi-stylers work using a combination of controlled airflow and heat, rather than direct plate contact at high temperatures. This is what makes them kinder to hair than traditional hot tools: the heat is gentler and more distributed, and the airflow does a significant portion of the styling work.
The FL!KT 6-in-1 includes six specific attachments: Round Blowout Brush (Small), Round Blowout Brush (Large), Multidirectional Autowrap Barrel (Small), Multidirectional Autowrap Barrel (Large), Smoothing Paddle Brush, and Hair Dryer Attachment. Three heat settings (60°C, 90°C, 120°C) and three airflow settings (15 m/s, 19 m/s, 23 m/s) give you full control across all hair types.
Multi-styler vs buying separate tools: is it worth it?
It's a fair question. Here's the honest answer.
The case for a multi-styler
If you style your hair regularly and want more than one type of look — blowout one day, waves the next — a multi-styler consolidates five or six separate tools into one. That's a meaningful saving on cost, storage space, and the time you'd spend switching between devices. It also tends to mean less overall heat exposure, because you're using one well-calibrated tool rather than layering different heat sources on top of each other.
For anyone who travels regularly, a multi-styler is an obvious win: one tool in your bag instead of three.
When separate tools might still make sense
If you only ever want one specific look — bone-straight hair, every single day — a dedicated flat iron gives you a precision that a smoothing attachment can't quite match. Similarly, if you're after very defined, tight curls rather than loose waves, a purpose-built curling wand with a narrow barrel may give you more control.
But for the vast majority of people who rotate between two or three styles depending on the occasion, a 6-in-1 is not just more convenient — it's genuinely the smarter investment

Every attachment explained: what it does and how to use it
Here's a breakdown of each of the six FL!KT attachments:
1. Round Blowout Brush (Small) — precision and shorter hair
The small round blowout brush is your tool for precision styling — ideal for shorter hair, fringes, layers, and face-framing sections. The smaller barrel diameter means more curl and definition per section, so it's also perfect if you want a tighter, more structured blowout finish with clear shape at the ends.
Use it on the sections around your face and shorter layers where a larger barrel would be too unwieldy. Roll under at the root to create lift, then draw down slowly to the ends and rotate inward to create that classic blowout flick.
2. Round Blowout Brush (Large) — volume and longer hair
The large round blowout brush replicates a salon blowout on longer, thicker hair. The larger barrel diameter creates more volume and a softer, more open curl — the kind of bouncy, full finish that used to require a separate hairdryer and round brush working simultaneously.
Work section by section from the underneath layers up. Roll the brush under the hair at the roots to create lift, then draw it down toward the ends with a slight inward rotation. For maximum volume, keep the airflow directed downward along the hair shaft rather than into the roots directly.
3. Multidirectional Autowrap Barrel (Large) — loose curls and big waves
The large autowrap barrel uses controlled airflow to automatically draw hair around the barrel, creating soft, loose curls or big, open waves depending on the section size you use. Hold the barrel close to a section of hair and the airflow wraps it gently — no manual wrapping required.
Hold each section for 8–12 seconds, then release and allow to cool completely before touching. For softer, more relaxed waves, use larger sections of hair. For more defined curls, use narrower sections. Alternate the direction you hold the barrel — toward the face and away from the face — for a more natural, undone result.
4. Multidirectional Autowrap Barrel (Small) — defined curls and tighter texture
The small autowrap barrel works on the same principle as the large, but the narrower diameter creates tighter, more defined curls with more structure. This is the attachment for anyone who wants a more polished curl pattern rather than loose beachy waves.
Use smaller sections for the tightest results. Hold for 8–10 seconds per section and let cool before releasing. As with the large barrel, varying the direction throughout your hair gives the most natural-looking overall result — avoid curling every section in the same direction, which can look too uniform.
5. Smoothing Paddle Brush — sleek and polished
The smoothing paddle brush is your go-to for a straighter, sleeker finish. It smooths the hair as it dries, taming frizz and reducing natural texture for a polished, clean look. This works particularly well for straight and wavy hair types — the airflow and gentle heat combination gets you a smooth result without needing a separate flat iron.
Use long, slow strokes from root to tip, keeping light tension on the hair as you go. On wavy hair, two passes per section gives a fully smooth finish. Point the airflow downward along the hair shaft to smooth the cuticle rather than ruffling it.
6. Hair Dryer Attachment — rough dry and prep
The Hair Dryer Attachment is your starting point — always. It removes bulk moisture before you switch to any styling head. With three airflow settings (15 m/s, 19 m/s, 23 m/s), point it downward as you work through sections to smooth the cuticle as it dries. Get hair to 60–70% dry before swapping to your styling attachment for the best results.
Point it downward as you work through sections to smooth the cuticle as you dry, rather than ruffling it upward. Using this nozzle first significantly shortens your total styling time and means each styling attachment only needs to work on nearly-dry hair — which improves results and reduces overall heat exposure.
Which attachment works best for your hair type?
Hair Type |
Best Attachments |
Top Tip |
Fine / Straight |
Round brush for volume, waving attachment for texture |
Use the lowest heat setting. Fine hair holds styles easily and doesn't need high heat. |
Medium / Wavy |
All attachments — the most versatile hair type for a multi-styler |
Alternate inward and outward curls for the most natural-looking finish. |
Thick / Curly |
Dryer nozzle first, then paddle brush or round brush for blowout |
Work in smaller sections than you think you need. Bigger sections = less control. |
Coily (Type 4) |
Dryer nozzle and paddle brush for stretch and smoothness before further styling |
Prioritise moisture retention — apply a leave-in conditioner before styling. |
How to get the best results: tips and technique
Always start with the dryer nozzle
Even if you're not going for a blowout look, use the nozzle to get your hair 70–80% dry before switching to a styling attachment. This shortens your overall styling time and reduces the amount of heat each strand needs to go through.
Apply heat protectant to damp hair before you start
Always. Even though multi-stylers operate at lower temperatures than traditional hot tools, heat protectant is still your most important prep step. Apply to damp hair before the dryer nozzle phase, and comb through to distribute evenly.
Section your hair — it makes a bigger difference than you think
Haphazardly running any attachment through your whole head of hair rarely gives you the result you see in tutorials. Divide into sections (4–6 for most hair types, more for thick or long hair), clip each up, and work methodically from the bottom layers upward. It takes slightly longer but the difference in result is significant.
Let curls cool before you touch them
After releasing a curl from any barrel attachment, resist the urge to immediately run your fingers through it. Give each section 30–60 seconds to cool and set in shape. This is the step that makes the difference between curls that last all day and curls that drop within an hour. Use the cool shot function if your tool has one to actively set the style.
Start with damp, not wet hair
Multi-stylers work best on hair that's been towel-dried to damp — not fresh out of the shower. Soaking wet hair takes much longer to style and increases the total heat exposure your hair experiences. Blot with a microfibre towel first, then start with the dryer nozzle.
Use a light-hold product to extend your style
A small amount of a lightweight cream or mousse applied to damp hair before styling helps hold the shape once it's set. Avoid heavy serums or oils before styling — these can interfere with the airflow and make the attachment less effective. Apply finishing products like shine spray or light hairspray after styling, not before.


Common mistakes to avoid
- Skipping the dryer nozzle phase. Going straight to a curling barrel on very damp hair gives you poor results and more heat exposure. Always rough dry first.
- Using sections that are too large. Bigger sections mean the airflow can't work evenly through the hair. Smaller sections = better, longer-lasting results.
- Moving too fast. Particularly with curling barrels — rushing means the curl doesn't fully set before you release it. Slow down, especially if you're new to the tool.
- Setting heat too high. Multi-stylers are effective at lower temperatures precisely because of the airflow technology. You don't need maximum heat for maximum results.
- Brushing through curls immediately. Wait for them to cool before you touch them or run fingers through. Patience at this stage makes your style last hours longer.
- Forgetting to clean attachments. Product build-up on barrels and brushes affects performance over time. Wipe down with a dry cloth after each session when cool.
Frequently asked questions
Can a 6-in-1 multi-styler replace all my separate hair tools?
For most people and most looks, yes. A multi-styler handles drying, volumising, smoothing, curling, and waving in one tool — which covers the vast majority of everyday styles. The exception is if you need very specific precision that only a dedicated tool delivers, like bone-straight results from a high-end flat iron or very tight curls from a narrow curling wand. But for rotating between multiple styles day to day, a 6-in-1 is more than enough.
Do I need to use a heat protectant with a multi-styler?
Yes, always. Even though multi-stylers typically operate at lower temperatures than traditional hot tools, heat protectant is still essential — especially on damp hair, where the cuticle is more open and vulnerable. Apply to damp hair before you start and comb through evenly before using any attachment.
How long does it take to style hair with a 6-in-1 multi-styler?
For most people, a full style (including the rough-dry phase) takes 15–25 minutes depending on hair length and thickness. That's comparable to the time it would take using separate tools — but in one continuous flow rather than switching between devices. With practice, most people find the time comes down significantly as they get used to each attachment.
Can I use a multi-styler on wet hair?
Towel dry your hair after washing until it's no longer releasing water, then begin with the dryer nozzle attachment to bring it to 70–80% dry before switching to your chosen styling attachment. Using any styling attachment on saturated hair gives poor results and puts unnecessary stress on your hair.
Which attachment should I start with if I'm new to multi-stylers?
Start with the large round blowout brush — it's the most intuitive attachment and gives a flattering, voluminous blowout finish that works for almost every hair type. Once you're comfortable with the technique (section, roll under at the root, draw down slowly), the other attachments become much easier to pick up. The autowrap barrels take a little more practice but the airflow does the hard work — just hold the barrel close to the section and let it draw the hair in
How do I get curls to last longer with a multi-styler?
Three things make the biggest difference: First, work in smaller sections — the smaller the section, the tighter and longer-lasting the curl. Second, hold the hair in the barrel for the full 5–10 seconds rather than releasing too early. Third, and most importantly, let each curl cool completely before touching it. Releasing and immediately disturbing the shape is the main reason curls drop quickly. A cool shot function helps actively set the style.
Is a multi-styler suitable for all hair types?
Yes — multi-stylers are designed to work across straight, wavy, curly, and coily hair types, though the most effective attachments and the results you get will vary. Straight and wavy hair types get the most complete range of results from all six attachments. Thicker, curlier, and coily hair types get excellent results from the dryer nozzle and smoothing attachments, and the curling barrels work well for stretching and adding definition, though the technique takes a little more practice.
Share:
Wet-to-Dry Hair Straighteners: Everything You Need to Know
LED Face Masks: The Complete Guide to At-Home Light Therapy